Django from first principles, part 2

MP 91: A single file, serving a basic version of the project's home page.
Note: This is the second post in a series about building a full Django project, starting with a single file. This series will be free to everyone, as soon as each post comes out.
In this post, we'll start building the BlogMaker Lite home page. Instead of doing this by running startproject and startapp, as is typically done in Django tutorials, we'll just write a single file that serves the home page.
The home page at this stage will only show the title BlogMaker Lite. This is similar to the Hello world! message that's typically displayed in a single-file introduction to other web frameworks. In the next post we'll expand the home page so it provides an appropriate description of what users can expect from the site.
Clients, servers, requests, and responses
If you want to understand how to use a web framework like Django, you really need to develop a clear understanding of a few terms: clients, servers, requests, and responses. If you're reading this you're probably online. You've almost certainly been using these ideas for a long time, even if you haven't been aware of them by name.
When you visit a web page your browser acts as a client, which sends a request to a server. The server receives the request, and sends a response back to your browser. For example if you're reading the web version of this post, we could represent the process like this:
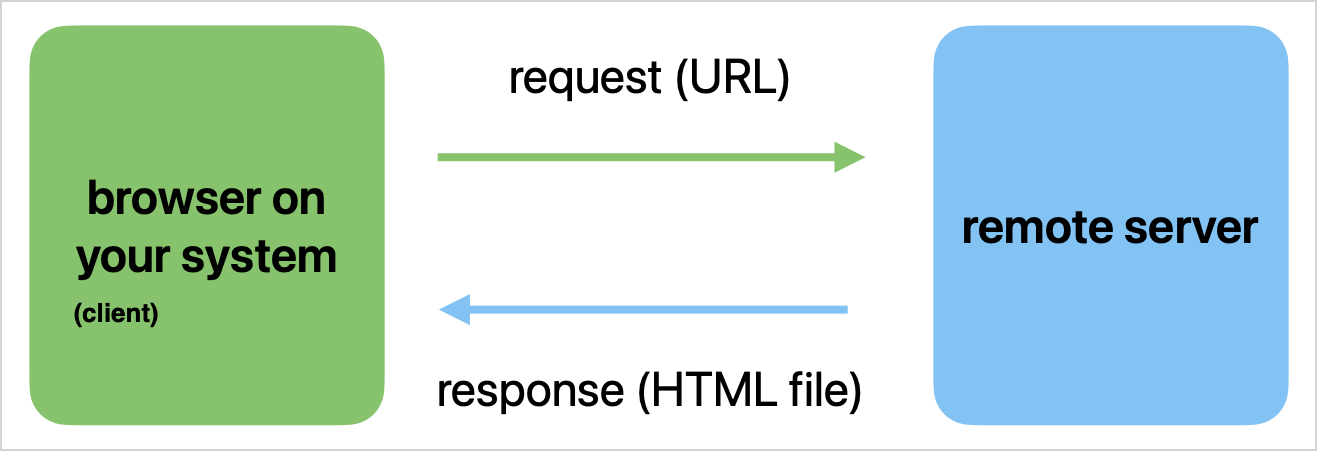
In the diagram above, "your system" might be a phone, a tablet, or a laptop. You enter the URL for this webpage in a browser (or click a link to this page), and your browser (the client) sends a request to the server that hosts Mostly Python. The server processes the request, and returns an HTML file representing this page. That HTML file is the response. 1
The steps shown in the above diagram happen billions of times every day. The actual number might be even higher than that; I don't know the exact scale of internet traffic these days. Every time someone visits a web site or gets a resource over an internet connection, some variation of this cycle happens.
All that on one machine?
As a web developer, you'll be making all this happen on your own system. For example, when you're working on a Django project on your own computer, this is what the process looks like:
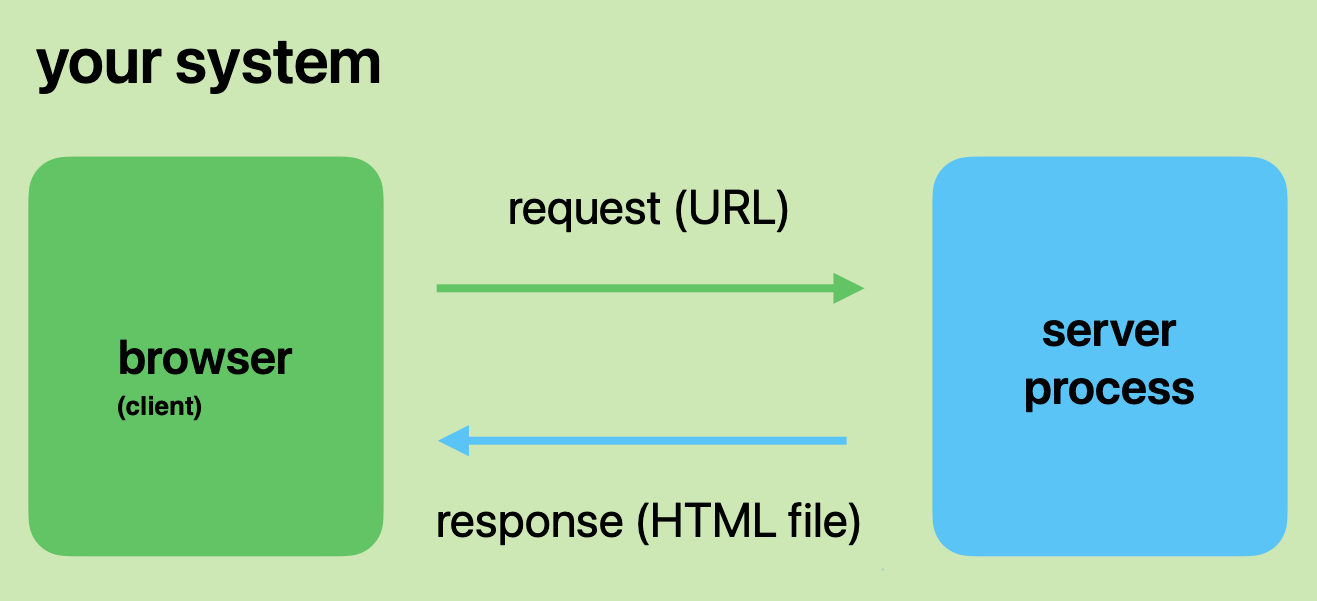
When you're learning to use a framework like Django and you're building a project on your own system, the client is still your browser. But this time, the server is also on your system. The server in this case is a Django process that's "listening" for certain requests. That Django process receives your request and issues a response, just as it would on a remote server.
A bit simplified
The diagrams and explanations above are a bit simplified. For example the request is made up of more than just a URL; it can contain other information such as what kind of browser you're using and session data that helps with authentication. However, the simplified process described here is the foundation of almost all web development work.
If you understood what's been covered so far, great! You'll recognize some of these parts in what we're about to build. If you didn't really understand this process, don't worry much about it now. We'll explain these parts in a number of different ways, and you'll see the process in action throughout this series. You'll have a few different ways to think about all this, both in your development work and in your ongoing use of the sites you visit every day. At some point, it will almost certainly start to make more sense.
Building BlogMaker Lite
Let's get started!
Make a virtual environment
We'll need to start with a virtual environment. If you're unfamiliar with them, a virtual environment is an isolated place on your system where you can build a Python project. Once it's set up, you can update it separately from all your other projects. You can also recreate the same environment any time you need, and you can build an identical environment on any other system as well. This will become important at the end of this series, when we deploy the project to a remote server.
Make a new folder for your project. Then use Python's venv module to create a virtual environment, if your IDE doesn't make one for you:
$ mkdir bml_project
$ cd bml_project
bml_project$ python -m venv .venv
bml_project$ source .venv/bin/activate
(.venv)bml_project$ pip install --upgrade pip
On Windows, the command to activate the virtual environment is a little different:
bml_project> .venv\Scripts\activate
With an active virtual environment, we can install Django:
(.venv)bml_project$ pip install Django
Collecting Django
  ...
Successfully installed Django-5.0.4 ...
Okay! If you see the message that Django was successfully installed, you can move on. If you have trouble with these steps, please post a comment and I'll try to walk you through these steps on your system. There are a lot of different systems out there, so don't be shy about asking a question.
Build the home page
We're starting the project as a single file, so let's jump right in. We'll write the file, run the project, visit the home page, and then try to understand what's happening.
Here's the file that serves the home page:
from django.conf import settings
from django.http import HttpResponse
from django.urls import path
from django.core.handlers.wsgi import WSGIHandler
from django.core.management import \
    execute_from_command_line

settings.configure(
    ROOT_URLCONF=__name__,
    DEBUG=True,
    SECRET_KEY="my-secret-key",
)

def index(request):
    return HttpResponse("BlogMaker Lite")

urlpatterns = [
    path("", index)
]

application = WSGIHandler()

if __name__ == "__main__":
    execute_from_command_line()
We'll look at all the parts of this file in a moment. For now, either type it all in, or copy and paste it into your editor. Save the file as blogmaker_lite.py, in the folder bml_project.2
Run the project
In a terminal window, run the project with the following command:
(.venv)blm_project$ python blogmaker_lite.py runserver
Watching for file changes with StatReloader
Performing system checks...

System check identified no issues (0 silenced).
March 30, 2024 - 06:21:45
Django version 5.0.3, using settings None
Starting development server at http://127.0.0.1:8000/
Quit the server with CONTROL-C.
The runserver command starts a server on your system that runs until you tell it to stop. This is what lets Django respond any time you issue a request. (If you're on Windows and have trouble running this command, try opening a simple console instead of a PowerShell terminal.)
The important thing to notice here is where the server is listening for requests. That's shown in the highlighted line above: http://127.0.0.1:8000. If you type or paste that address into your browser, you should see the project's simple home page:

Everything we talked about at the start of this post is happening here. The browser is acting as the client. The request is being passed through the URL; The part of the URL that reads 127.0.0.1 is a reference to the local computer. Most requests get routed to the internet, but this routes the request to a port on your local system. Django's development server, which we started with the runserver command, listens for requests on port 8000.
When Django received the request, it prepared a response consisting of the string "BlogMaker Lite". This string was packaged up into an HTML file, which was returned to the browser. The browser then displayed that HTML file as a standard web page.
Using localhost
The location 127.0.0.1 is mapped to the name localhost. So you can also reach the home page by using the address http://localhost:8000. When you're entering an address in your browser, you can often shorten this to localhost:8000.
Understanding the parts
Now that we have a working project, let's go back and understand the parts we've written so far.
Imports
We made a number of imports at the start of the file:
from django.conf import settings
from django.http import HttpResponse
from django.urls import path
from django.core.handlers.wsgi import WSGIHandler
from django.core.management import \
  execute_from_command_line
Django is a web framework "with batteries included". That's a nice way to say that Django comes with most of what you'll need to build a full, modern web project. Minimalist frameworks require you to choose a larger number of additional packages and install them as your project grows. That's part of why comparisons between Django and other "simpler" frameworks aren't always fair. When people actually build out real-world projects using those frameworks, they end up installing third-party packages that are roughly equivalent to much of what Django includes by default. 3
The import statements shown here support the minimum functionality needed to serve a simple web page.
Settings
Django is a framework for building web apps. The phrase "web apps" encompasses a huge range of use cases these days. You can have a mostly static website with some content that's just for members. You can build an iPhone app that's served by a Django backend. You can even build out a full "desktop" application that runs in the browser. Because of this wide range of use cases, there are a lot of settings available in Django.
To serve the simplest version of a home page, there are three settings we need to define right away:
settings.configure(
    ROOT_URLCONF=__name__,
    DEBUG=True,
    SECRET_KEY="my-secret-key",
)
The first setting, ROOT_URLCONF, is short for root URL configuration. This tells Django where to find the URLs it should listen for. Here, __name__ refers to the current file, blogmaker_lite.py. We're going to define the URL that Django should listen for in this file.
The second setting, DEBUG, tells Django whether to show debugging information in the response if anything goes wrong. We want this set to True for local development; otherwise it's much harder to troubleshoot when you don't get the response you're expecting. We'll set this to False when we deploy the project to a remote server.
The final setting, SECRET_KEY, is used to help keep the project secure when it's deployed. We'll set this to an appropriately unique value when we deploy the project. For local work, it just needs to be set to something, or you'll get a bunch of warnings in your terminal every time you load a page.
The view function
Django, and many other frameworks, follow an "MVC" architecture. That's short for model-view-controller. Later, we'll build a model of the data we want to work with. We'll define ways the user can view the data in the project. There are a bunch of different ways we can control how users interact with the project, and how Django responds to requests that come in.
For now, we define one way for users to view the project:
def index(request):
    return HttpResponse("BlogMaker Lite")
This is a view function. It's called index() because that's the name typically used for a project's home page. It takes in the request object, which Django packages up based on the information it received in the request. We're not using any of that information right now, but later we'll be able to find out things like "Is the user authenticated? If they are, what's their username?"
The index() function returns an HTTP response, consisting of the single string "BlogMaker Lite". The function HttpResponse() wraps this string in a basic HTML file. You can see the HTML file that Django generates if you look at the project's home page in your browser's inspector tool:
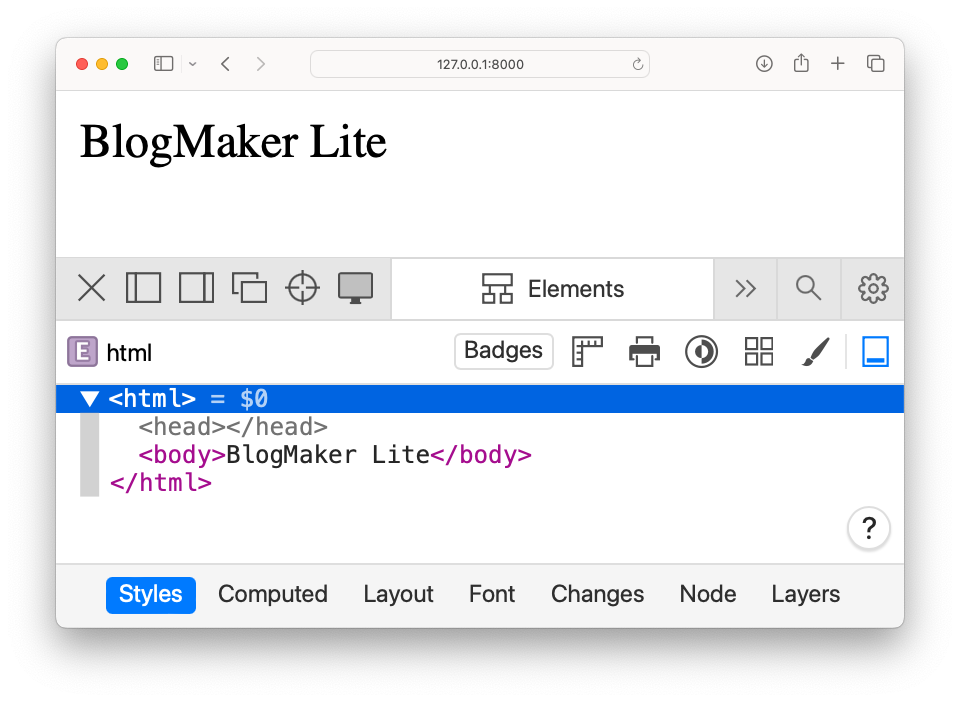
HttpResponse() function generated.In this project, we'll write one view function for each page in the project.
URL patterns
We need to define the URLs that our project listens for. Django listens for URLs that come in through port 8000 on localhost, but it's not going to respond to just any request that comes in. We'll define which URLs it should respond to.
Here's the first URL we define:
urlpatterns = [
    path("", index)
]
We write code that represents URL patterns, because we don't actually want to write out every possible URL that might come in. For example once we have a number of blogs, we'll want to be able to support URLS such as:
http://localhost:8000/blogs/1/
http://localhost:8000/blogs/2/
http://localhost:8000/blogs/3/
...
http://localhost:8000/blogs/1000000/
If we become the next great blog host, we don't want to have to write a new URL for every blog that someone starts! Instead we'll define a pattern that all these URLs fall into.
Each URL pattern can be thought of as a path to a view function. The function call path("", index) defines a URL pattern that maps an empty string to the index() function we defined earlier.
What does an empty string mean for a URL? Consider the following snippet:
$ python
>>> base_url = "http://localhost:8000"
>>> url_parts = ""
>>> url = base_url + "/" + url_parts
>>> url
'http://localhost:8000/'
The base URL for all requests is http://localhost:8000. That exact URL will only work for the home page; most requests will have additional parts. Here we assign that base URL to a variable, base_url. Then we assign the additional parts to url_parts. The actual URL that needs to be handled is built by combining the base URL with the URL parts, separated by a forward slash.
If url_parts is an empty string, we get the URL you entered into your browser earlier. Django works in a slightly different way than this, because it's actually deconstructing the URLs it receives, rather than building URLs. But the call path("", index) effectively maps the base URL http://localhost:8000 to the view function named index.
WSGI
The acronym WSGI stands for web server gateway interface. We have this line in our file:
application = WSGIHandler()
This line causes Django's WSGIHandler class to handle requests that come in, and build an appropriate response that can be returned.
It's often relatively easy to find the source code of the parts of Django you're working with. The import path for WSGIHandler appears at the top of blogmaker_lite.py:
from django.core.handlers.wsgi import WSGIHandler
If you go to the main Django repository on GitHub, you'll see a folder called django. Click on that, and then click on each of the names you see in the import statement in turn: core, handlers, and wsgi.py. In the file wsgi.py, search for WSGIHandler. You'll end up here:
class WSGIHandler(base.BaseHandler):
    request_class = WSGIRequest

    def __init__(self, *args, **kwargs):
        ...

    def __call__(self, environ, start_response):
        ...
        return response
If you're brand new to Django, don't spend much time trying to understand this code right now. You should keep in mind as you're learning Django, however, that all the source code is just a few clicks away. It's not magic; it's a lot of work over many years figuring out how to efficiently turn requests into responses. It's kind of nice to see the simple line return response. That's the core of what Django does.
In our example, this tells Django what part of its codebase should be used to process requests and generate responses.
execute_from_command_line()
Here's the last couple lines of blogmaker_lite.py:
if __name__ == "__main__":
    execute_from_command_line()
The if block lets us run this file directly. When we do, the function execute_from_command_line() takes any arguments we pass in, and executes them.
Here's the command we used to run this file:
(.venv)blm_project$ python blogmaker_lite.py runserver
Here we're asking Django to execute the runserver command. This starts a process that listens for requests coming in through the address localhost:8000. When you want to stop processing requests, you can press Control-C in the terminal where you issued this command.
Conclusions
Whew! That's a lot! But if you followed all this, even very roughly, you're doing great. This was a long post, but it covered the most fundamental aspects of how Django projects work.
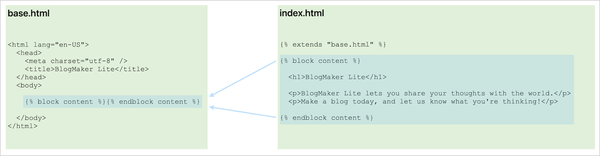
We did all this with a single file, blogmaker_lite.py. In a typical Django project, the responsibilities handled in this one file are spread across a number of different files such as settings.py, views.py, urls.py, and manage.py. We'll be creating those files as our project expands, but we'll only do so when it's necessary for this project.
In the next post, we'll build out a more meaningful version of the project's home page.
Resources
You can find the code file from this post in this commit of the django-first-principles GitHub repository.
Servers often send other resources as well, such as CSS and JavaScript files. Servers can also respond by sending any number of file types: images, text files, PDFs, and much more.
For a moderate-length file like this, it can be really good to type it in by hand. Doing so makes you pay attention to each part of the program in a way that's much different than just copying and pasting. You'll likely make some typos, and fixing them gives you practice with debugging and troubleshooting.
That said, this shouldn't become a frustrating experience. If you start to spend too much time troubleshooting typos, and it's more frustrating than beneficial, it's probably a better idea to paste the file into your editor and move on.
Most mature Django projects include some third-party packages as well, but Django includes most of what you need for your project in its own libraries. The third-party packages you do need in a Django project are typically packages that need to be maintained on a different timeframe than Django itself. For example, there are some authentication packages that benefit greatly from being updated more frequently than Django can push out new releases.